Orchard crate


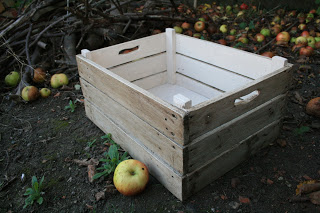
Delighted recently to receive a commission from a lovely young couple for a wooden box in which to place presents at their wedding reception. Stuart and Nicky were hoping for something with a similar finish to the herb planter I blogged about in June, but in the style of an apple crate or bushel box – quite appropriate for the time of year!


I selected timber reclaimed from old delivery palettes to build the box; once the nails and staples have been removed and the individual pieces planed and sanded, you are left with a perfectly good construction material. All the better, in my book, for being recycled, and into the bargain possessing that worn and distressed air which becomes accentuated by the final coat of coloured wax, bringing out the roughness of the wood grain.

The orchard crate makes a handy box for storage, or to carry things around in the garden. Of course, with the addition of a thick, polythene liner, it would make a great planter for the kitchen garden.

I think I need to build a few for myself.

Note: The holes for the handles were cut using the stick from a Walls Magnum ice cream as a template. I regret to report that said frozen comestible remains unaccounted for.
Follow

In the box


Every now and again, you have to give into temptation. Some old floorboards leaning against the shed have been crying out to be turned into something altogether more interesting and useful. We’d been thinking about introducing a line of vintage effect wooden garden planters if there’s sufficient interest and, needing an original gift for a good friend, the chance to make a prototype box and plant it up with a selection of mediterranean herbs seemed too good to miss.

Having assembled the box, I found myself in two minds as to whether to leave the box totally untreated as the old floorboards had quite a bit of character. But the opportunity to trial a particular aged paint finish won out in the end. With a coat of primer and a top coat in a silvery grey shade, the corners and edges were sanded to remove any splinters, and the sander was also applied to the painted sides to enhance the impression of years of wear and tear. The next step was to apply a dark coloured wax with wire wool, which will protect the wood further. It also built up in the rough surface to accentuate the texture. A thick black polythene liner gets stapled in next, with holes punched through to align with the drainage holes drilled into the plywood base. A free draining compost and a scattering of water retaining gell crystals (not as critical with herbs as with other containerised plants, but helpful nonetheless), it was ready to be planted with a selection including sage, rosemary, basil, thyme and the curry plant Helichrysum italicum.

So much for the finish. It was around this stage that I realise that I’d taken some old timber, cut it to size, cleaned it up, sanded it down – and then spent several hours painstakingly making it look like...old timber. But I think the trouble was worth it...and hope you agree.


Now all that remains is to brush all the sawdust of everything in the potting shed.

Follow